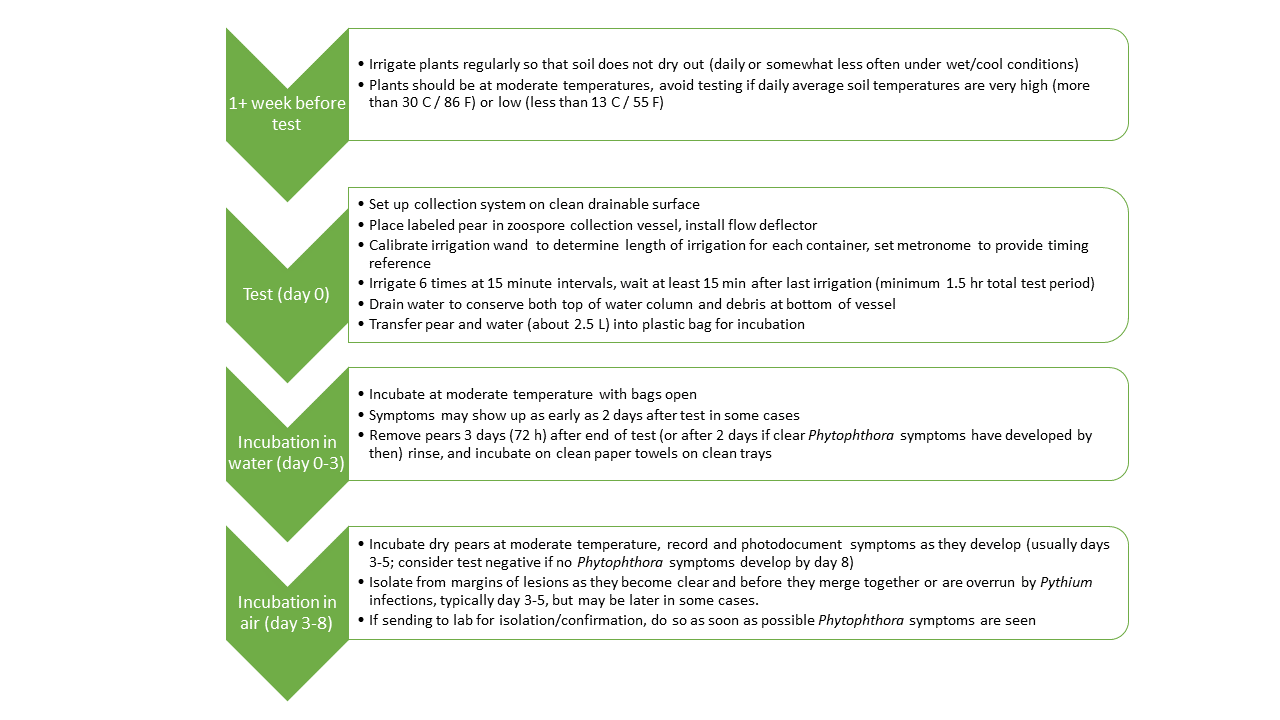
Version 08/25/2022
Note: See this page for links to videos describing and demonstrating this testing procedure.
Application: Testing blocks of plants on a bench (or cart) for the presence of Phytophthora. Tests the entire root systems of all plants in the test array and indicates whether any of the plants are infected. This baiting test detects zoospores released from sporangia on the root system during 6 repeated irrigations at 15 minute intervals. A calibrated amount of water is applied to each container for each irrigation.
Advantages: Allows testing of many plants at once. Can be conducted without moving plants from benches. Plants do not have to be unpotted. Nondestructive and does not expose other plants to inoculum beyond what may occur during irrigation. No false positives if bait spots are confirmed by culturing. Culturing can identify Phytophthora species present.
Limitations: Positive reactions require at least several days to develop and can take longer to confirm depending on methods used (Figure 3). Baiting conditions (temperatures, irrigation history) can affect test sensitivity. Previous application of fungicides (systemic oomycete suppressive chemicals) to tested plants may interfere with test. No single bait is optimal for all Phytophthora species. Does not identify which plants or how many plants within the tested block are infected. This protocol is designed for plants that have been regularly irrigated up to the time of testing and are likely to have sporangia present on their roots. It should not be used for plants that have been dead or dry for an extended period. See 3.3. Individual plant sampling/baiting for protocols for testing dead plants.
The standard protocol described below has detected a variety of Phytophthora species in container-grown nursery plants across a wide range of temperatures and in a variety of test situations. The lower detection limit for this test had not been determined, but Phytophthora can be detected in test arrays with known infection rates as low as 2.4%. Detection efficiency is also influenced by the infection level and root density of the Phytophthora source plants.
Recommended practices: Plants should be tested when they are well-established within a given container size (with high root density). Testing should occur before rather than right after plants are moved into larger containers.
If a plant batch is large enough or spread out enough that plants differ with respect to potential for contamination (e.g., spread out across multiple benches), split the batch into smaller sub-batches with more uniform risk profiles and test each sub-batch separately.
If the tested batch has dead plants, test these separately using soil/root sample baiting of the plant root system (Section 3.3) if Phytophthora is suspected.
Use biased sampling to select plants may be more likely to be infected. Such plants may include:
When testing small plant batches in which the entire batch can be tested at once (about 40 or less, depending on container size) biased sampling is not needed. See Section 2.2 for additional guidelines for selecting plants to test.
Where possible, test plants in a minimum of 2 or 3 separate test arrays. For a given batch, test groups of highly symptomatic/high risk plants separately from plants with less obvious symptoms or less severe risk factors to avoid potential dilution of inoculum that may reduce test sensitivity. As noted above, it is preferable to test plants with a similar risk profile separately from others that may have a different risk profile, even if plants are in the same batch. If batches are split between multiple blocks (block = contiguous set of plants on a single bench or in different sections of very long benches), each block should be considered separately when planning tests because contamination risk can vary spatially in the nursery due to many factors.
Because the amount of inoculum produced by a given infected plant or set of plants can vary over time, consider conducting additional tests on a batch on different dates, separated by a week or more when possible. Repeat testing over time may be especially beneficial when conducting tests to delimit the extent of a known infestation. Because repeat testing provides a higher degree of confidence, it should be considered for special-status plants or plantings targeted for limited habitat areas that require the cleanest plants possible.
For large plant batches (more than 100-200 containers):
For small plant batches (100-200 containers or less):
See 2.4. Optimizing sample method and sample size for the bench leachate test for a full discussion of sample selection and sample size for this method. See Results below for information about interpreting test results.
Equipment: This method is based on collecting irrigation water that drains out of a set of nursery plant containers and directing it into a specialized collection vessel that contains a bait. The two main components of this system are described below. Results of test conducted by different parties can be compared more meaningfully if the same standard testing equipment is used.
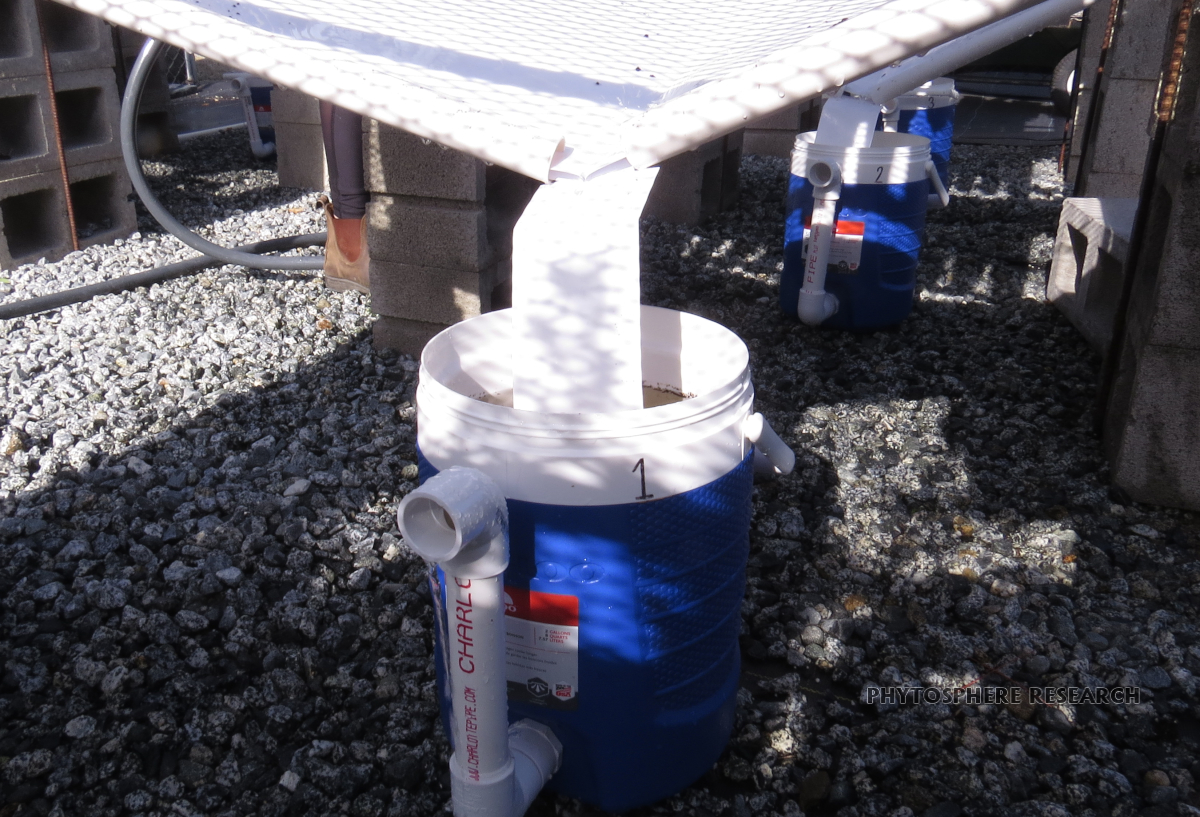
Runoff collection system: See this link for instructions on building the collection system described here and shown in Figure 4.
Runoff is best channeled and collected using a smooth, easily sanitized, inert sheet material that will fit under the benches where testing will occur. Vinyl flashing works well (available in rolls of varying widths, wider widths are easier to work with); the glossy side should be used for the collection surface. Multiple sheets can be overlapped to obtain sizes needed for varying bench lengths and widths. The collection surface can be suspended beneath a bench using nylon cords. The cords tie or hook to the sheet on one end and are hooked to the bench or pots on the bench on the other end (Figure 4). We use plastic cord locks to help adjust the lengths of the cords. The collection surface needs to be sloped to drain to one end and the flow needs to be channelized so that all of the water will run into the zoospore collection vessel (ZCV) (Figure 4). See this link for instructions on building the collection system in Figure 4. The outflow from the runoff collection sheet should be set as close as possible to the top of the ZCV to minimize splash and turbulence. We also recommend the use of a flow deflector or slide to minimize turbulence in the ZCV. It is placed to bridge the gap between the collection sheet and the ZCV below it (Figure 4D, Figure 5B) and should be oriented to allow water to flow smoothly down the slide from the collection sheet. This reduces both splash and turbulence in the ZCV, which may otherwise reduce test sensitivity. The slide can be made from a strip of vinyl flashing (8-10 cm wide).
Zoospore collection vessel (ZCV): See this link for instructions on constructing the zoospore collection vessel.
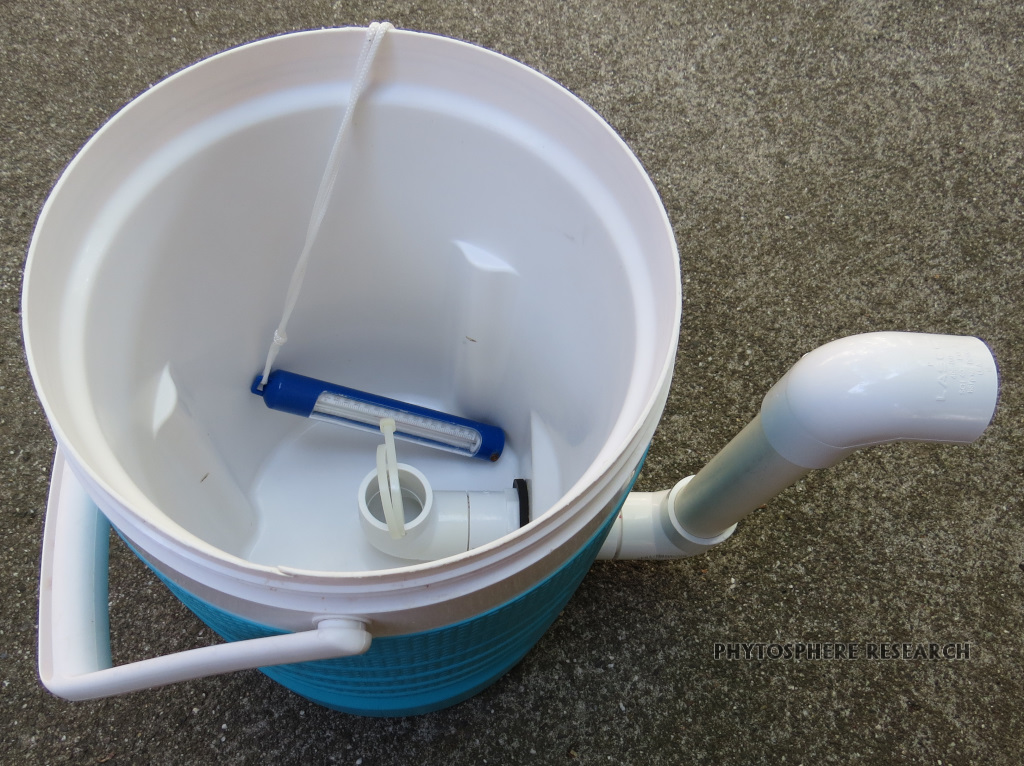
The zoospore collection vessel is designed to optimize detection of zoospores by increasing zoospore concentration around the floating pear bait. Zoospores swim upward and should concentrate near the top of a water column. The vessel is relatively tall and narrow to maximize zoospore concentration near the top of the water column. Debris that may contain sporangia, oospores, and encysted zoospores tends to either float or settle to the bottom of a water column. The collection vessel is designed so that excess water drains from the lower middle portion of the water column.
The standard ZCV is made from a 7.6 L (2 gallon) insulated plastic beverage jug with an internal depth of 30 cm (12 inches) and internal diameter of 20 cm (8 inches) as shown in Figures 4, 5A. Water drains from the vessel through an open pipe elbow about 7 cm (2.75 inches) above the inside bottom of the vessel. The water flows out through an elevated external pipe that will leave the water level in the vessel about 6 cm (2.5 inches) below the rim of the vessel 5A. The diameter of this drain pipe needs to be large enough to prevent water from overflowing the top of the vessel during peak water flow from the irrigated pots. An internal diameter of at least 2.5 cm (1 inch) is large enough to handle peak flows from the largest arrays of containers we have tested (up to 42 #1 or 6 # 5 containers).
For testing small batches of small containers that will which generate low amounts of leachate (generally less than 6-8 L [1.5-2 gal]) and low runoff rates, we have used a "mini ZCV", in which leachate is collected directly into a 1-gallon heavy-duty zip closure bag fitted with an outflow similar to that in the standard ZCVn Figure 8. See this link for instructions on how to construct the mini ZCV.
Other possible vessel designs (such as vessels that are larger in diameter, or have different heights or volumes) have not been tested and may not be as efficient for baiting, so we recommend using a vessel as close as possible in size and shape to these two designs.
Methods: Standard baiting uses green, nonwounded pears, which can be infected by a wide variety of Phytophthora species. Most pears will float in water. If the pear sinks, use a different pear or make a pear floatation device (PFD) for it by using a clean rubber band to attach a small piece of closed cell foam (e.g., a packing peanut) to the pear. Leaf baits can also be used if you have arrangements for testing these baits. Leaf baits should also be floated on the water surface. See 3.2. Detection by baiting – general procedures for more information on choosing pears and baiting procedure details.
Pre-test conditions: Plants to be tested should have been receiving regular irrigation prior to testing. Sporangia may not be present in the soil of plants that have been dry for an extended period. Testing should be done when average soil temperatures have been in the range of 18-24°C (65-75°F) for at least three days, preferably a week or more. These temperatures are favorable for sporangium production in a wide range of Phytophthora species. It is possible to detect some Phytophthora species at temperatures outside of this temperature range, but detection efficiency for a number of Phytophthora species may be reduced when soil temperatures are well above or below this range.
Water temperature: The temperature of irrigation water applied during the test should be no higher than about 22-25 C (72-77 F) if possible. We have successfully baited Phytophthora niederhauserii (growth optimum 30 C [86 F], maximum 37 C [99 F]) using warmer irrigation water, but not all Phytophthora species will be successfully baited at very high or very low temperatures. If temperatures are high and hoses have been lying in the sun, run the water until it cools to a stable acceptable temperature before applying it to the plants.
Standard testing protocol: Suspend the runoff collection system beneath a mesh bench or cart that has been washed to remove debris, sanitized by rinsing with a fresh 0.5% NaOCl (diluted bleach) solution, and rinsed with clean water to remove all bleach residues. If you will be reusing the same space to test a different batch of plants, this sanitation process needs to be repeated before the next test, along with cleaning and sanitizing the runoff collection system and zoospore collection vessel. If conducting a second test on a single plant batch, rinse off the bench, collection system, and ZCV with water between tests; they do not need to be sanitized.
Place a labeled, unwounded, green pear (with a PFD if needed) in the bottom of the zoospore collection vessel (ZCV) before starting irrigations. Tests show the pear can be infected by zoospores during the irrigation period, so it is important to have the pear in the ZCV before you start irrigating. Plants will be irrigated 6 times at 15 minute intervals with a calibrated amount of water (see Irrigation volume below). Irrigation is applied individually to every plant container in the test batch, not simply sprayed over the top. Irrigation must not overflow the head space in the container and flow over the rim. Use an irrigation wand with an on/off lever or trigger. For small containers in trays or racks (such as Deepots), use an irrigation wand that can produce a narrow stream of water that can be directed into each container. Directions for constructing such a wand are at this link. The objectives of the test irrigations are to:
Any water that does not flow through the container media will only dilute the spores in the collection vessel unnecessarily and can reduce the sensitivity of the test. Applying equal amounts of water to all plants in the test minimizes bias associated with drainage rates or the amount of headspace in individual containers, which are not necessarily related to their risk of being infected. To the degree possible, avoid excessive splashing between containers in the test; some splash between containers in a close-packed test array is unavoidable.
Under hot or sunny conditions,try to keep hoses in the shade to the degree possible and be sure to check the temperature of the water coming out of the wand before each irrigation event. If hoses or aboveground pipes are exposed to sunlight, the initial water temperature may be very warm, so run it until it cools before each irrigation event (see Water temperature above).
Irrigation volume: The amount of water that can be applied to a container before overflowing the container rim is limited by the amount of headspace (distance between the soil line and the pot rim), the drainage rate of the potting media, and the flow rate from the irrigation wand. It is easier to apply the target amount of water per irrigation if containers have adequate headspace (at least 1 cm for small containers, more for larger containers). If there is very little headspace in the containers, you will need to use a very low flow rate and/or apply water to each container in two (or more) doses for each irrigation event. Apply the first dose of water to each of the containers in the test and then apply the second dose after the water has drained out of the headspace. Making multiple passes to complete one irrigation event can increase the amount of time needed to run each test, so fewer tests can be run in parallel if container headspace is low.
Based on tests we have conducted, the recommended application volume for each of the six irrigation events is between 15 and 20% of the nominal container volume. The sum of the volume applied in all six irrigations used in the test is approximately equal to the nominal container volume, so each irrigation is close to one-sixth (about 17%) of the container volume. Table 1 below shows approximate water volumes to apply to containers of different sizes that have been rounded to convenient even volumes. If using another type of container, calculate the amount needed per irrigation event by multiplying the actual container volume by 17.5% (midpoint between 15 and 20%).
Table 1. Standardized volumes of water for bench testing of leachate from container plants. The irrigation volume listed should be applied to each container for each of the six irrigations used in the standard protocol The total amount of water applied for a test (all 6 irrigations) is approximately equal to the nominal volume of the container. Note that container volumes are based on data from suppliers and may not be exact. Also, some container types (e.g, #5 or "5 gal") have multiple designs that may vary in volume.
| Container type | Container volume, ml | Irrigation volume per irrigation, ml | Percentage of container volume per irrigation |
|---|---|---|---|
| LT6 / RCL4 | 65.5 | 12 | 18.3% |
| RP (Rose pot 2.25x3.25 inch) | 100 | 18 | 18.0% |
| SC7 Supercell Stubby | 107 | 20 | 18.7% |
| SC10 Supercell / LT8 | 164 | 30 | 18.3% |
| DP16 (Deepot 16) | 262 | 45 | 17.2% |
| "TB2" / AB35 (Treeband 2x5 inch) | 397 | 70 | 17.8% |
| DP40 (Deepot 40) | 655 | 110 | 16.8% |
| DP60 (Deepot 60) | 983 | 165 | 16.8% |
| "TB46" / AB46 (Treeband 3.6x6 inch) | 1,098 | 200 | 18.3% |
| "TB410" / AB410 (Treeband 4x10 inch) | 2,340 | 400 | 17.1% |
| "TP413" / CP413CH (Treepot 4x13.5 inch) | 2,650 | 450 | 17.0% |
| "TP414" / TP4 (Treepot 4x14 inch) | 2,830 | 500 | 17.7% |
| #1 ("1 gal") | 2,839 | 500 | 17.6% |
| #5 ("5 gal") | 14,385 | 2500 | 17.4% |
| #15 ("15 gal") | 49,210 | 8000 | 16.3% |
Calibrating irrigation applications: To consistently deliver a fixed amount of water to each container, calibrate the flow rate of the irrigation wand before the test. Without a reference beat to help with timing, the irrigation length becomes more variable between containers and successive irrigations. Calibration requires a metric calibrated container (e.g., a graduated cylinder or measuring cup) and an electronic metronome or metronome application (many free metronome apps are available for both iOS and Android devices). The calibrated container should be sized to the approximate range of the water volume delivered at each irrigation, so several different measuring containers (from 100 ml up to 2 L or more) may be needed for tests on stock of varying sizes (see Table 2 below).
To calibrate, adjust the water flow rate from the irrigation wand to a suitable range that will not cause excessive splash or fill the headspace in less than one to several seconds. Set the metronome to a 1/1 time signature or other setting that provides one beat per measure. Set the beats per minute (bpm) to a range that will provide an even number of beats to deliver the target volume into the measuring device. Metronome pulse rates of about 60 to 90 bpm work well. Table 2 below provides a number of example metronome timings and flow rates that have been used in tests of various container sizes. With the metronome running, open the irrigation wand valve and use the graduated cylinder to capture water coming out of the wand for the target number of beats. Check the volume delivered, and adjust the flow rate upward if the volume is less than the target or downward if the volume is too high. Repeat this process until the wand delivers the target volume in a whole number of beats. Adjusting the flow is easier if there is a regulator at the irrigation wand; hose bibb valves can be difficult to adjust to a precise and constant flow rate. The irrigation flow rate needs to be stable during the test for the calibration to remain constant. Avoid using water lines that will have pressure fluctuations, or consider using a pressure regulator on the line. Readjust the flow rate by recalibrating if water pressure or flow changes substantially during the test.
Irrigation during the test: Once the flow rate has been calibrated (e.g., 5 beats at 75 bpm to deliver 500 ml to a TP414, flow rate=125 ml/sec), each container is irrigated for the required number of beats. If the entire volume cannot be applied at once due to limited head space, split the irrigation time into two or more shorter periods for each irrigation. For example, in a test of TP414 containers with low headspace, it may be necessary to split the required 5 beats of irrigation time into a round of 3 beats (300 ml) for each, followed by a second round of 2 beats (200 ml). If containers are spaced tightly and easily accessible, water can flow continuously as the irrigation nozzle is shifted from one container to the next at the appropriate beat. Stop the water flow between containers and restart on the next beat if containers are more widely spaced or if plant canopies interfere with free movement of the irrigation wand.
Table 2. Metronome timings for single irrigation events for various nursery container sizes and irrigation wand flow rates. Maximum flow rates are limited by container size and the amount of head space in the container. If it is necessary to run tests on containers of different sizes concurrently, it is most convenient to select a flow rate and metronome speed that generates an even number of beats for each container size.
| Container type | Irrigation volume, ml | metronome setting, beats/min | Irrigation duration, beats | Irrigation duration, sec | Flow rate, ml/sec |
|---|---|---|---|---|---|
| SC7 | 20 | 60 | 2 | 2 | 10 |
| SC10 | 30 | 60 | 3 | 3 | 10 |
| SC10 | 30 | 60 | 2 | 2 | 15 |
| DP16 | 45 | 60 | 3 | 3 | 15 |
| DP16 | 45 | 80 | 3 | 2.3 | 20 |
| TB2 | 70 | 60 | 3 | 3 | 23.3 |
| TB2 | 70 | 69* | 4 | 3.5 | 20 |
| TB2 | 70 | 88* | 3 | 2 | 34.375 |
| DP40 | 110 | 75 | 4 | 3.2 | 34.375 |
| DP60 | 165 | 75 | 6 | 4.8 | 34.375 |
| DP60 | 165 | 68* | 3 | 2.6 | 62.5 |
| TB46 | 200 | 75 | 4 | 3.2 | 62.5 |
| TP414, #1 | 500 | 75 | 10 | 8 | 62.5 |
| TP414, #1 | 500 | 75 | 5 | 4 | 125 |
| #5 | 2500 | 75 | 15 | 12 | 250 |
| #15 | 8000 | 75 | 48 | 38.4 | 250 |
| #5 | 2500 | 90 | 10 | 6.7 | 375 |
| #15 | 8000 | 90 | 32 | 21.3 | 375 |
* indicates approximate metronome setting (rounded to nearest bpm) to approximate the target volume at the flow rate shown. Approximate metronome settings are normally used when irrigating two different container sizes with the same wand set at a given flow rate.
Mark the start of irrigation and record each start time on your data sheet (an example data sheet is here). Starting a 15 minute timer at the start of each irrigation can help you keep track of when to begin the next irrigation event. It will take at least 1.5 hours to run the test from the start of the first irrigation to the point that the pear baits can be transferred.
Especially for larger plant batches or containers that drain rapidly, check to see that the water flow rate does not exceed the collection vessel’s outflow rate. If the water in the vessel gets too close to the rim, pause irrigation periodically or use a lower irrigation flow rate. You can also tilt the outflow slightly to increase its distance below the rim. During the test, check to make sure that the pear is floating once the water level in the ZCV is high enough. The pear can sometimes get wedged between the ZCV wall and the internal drain pipe or under the flow deflector. Some pears that float initially inexplicably sink after a while. If this occurs, use clean gloved hands to remove the pear, attach a pear floatation device, and return the pear to the ZCV. Test sensitivity can be reduced if the pear is not floating during the test. If necessary, keep the ZCV shaded to prevent excessive heating of the water in the vessel during and after the test.
Transferring pear bait and water after the test: After the last irrigation, let the containers drain for at least 15 minutes. Allow a longer time if substantial water drainage is still occurring; the flow from the containers should be stopped or nearly stopped. If necessary, the pear can remain in the vessel for an extended period after the last irrigation if it is not subject to cross-contamination or temperature extremes. Wearing clean gloves, remove the pear and place it into a labeled 1-gallon heavy-duty zip closure plastic bag (e.g., 1 gallon Ziploc® freezer bag) that is supported in a plastic container. A plastic bleach container (3.78 qt to 1 gal) or similar heavy-walled plastic bottle of this size cut off just below the handle is suitable for supporting a 1-gallon bag (Figure 7). Slowly drain excess water from the center of the water column through the outflow by pivoting the outflow downward (Figure 6). For the standard ZCV, water should be drained until the remaining depth is about 10 cm, which will leave about 2.7 L in the vessel. Pour the remaining water, which will include both surface water and soil/debris from the bottom of the vessel, into the plastic bag with the pear. The bag should not be filled more than 1 cm above the rim of the plastic vessel used to support the bag. A one-gallon freezer bag will hold up to about 2.7 L with some space left at the top. Leave at least 7-8 cm (3 inches) of space above the water line in the bag so it can be sealed for transport and to prevent spillage. Leave an air bubble in the top of the bag when it is sealed for transport.
If filled sample bags will be held for an extended period (more than 1-2 h) before transport to the incubation chamber/room, leave the bag open in a cooler where it will not be subject to a rapid change in temperature and is not subject to cross-contamination (Figure 7). If it is sunny, be sure that the pear baits in water are in the shade and not allowed to heat above about 27 C [80 F]. Protect the pear baits in water from elevated temperatures, rapid changes in temperature, or excessive vibration. These conditions can cause zoospores to encyst and may reduce the sensitivity of the test.
If the mini ZCV is used, only a small amount of water needs to be drained to ensure that water will not overflow the drain pipe when the container is moved. The vessel can be tilted enough to allow the water to drain about 1 to 2 cm below the outflow. The short horizontal drain pipe is removed from the upper elbow and replaced with a PVC plug to prevent leakage. The outer bag is then pulled up above the drain to prevent leakage. The pear is incubated directly in the bag that serves as the mini ZCV. The bag should be closed to prevent splash or cross-contamination during transport but opened during incubation.
Incubate and evaluate pears as discussed in 3.2. Detection by baiting – general procedures. The plastic bag should be opened to allow air exchange during incubation (Figure 7).
Phytophthora lesions typically appear on baits no sooner than about 2 days after the end of the leaching procedure. Most lesion will show up within 3-5 days after the leaching procedure, but in some cases, symptoms may not become obvious until 8 days. If no Phytophthora symptoms are apparent 8 days after the leaching procedure, test results are negative (i.e., no detection). The timeline for testing is summarized in Figure 3.
Testing multiple plant sets at once: With multiple sets of equipment (collection systems and ZCVs) and adequate bench space, multiple tests can be run in parallel. Allow adequate separation to prevent any cross-contamination via splash between different test sets. Depending on the number of plants tested in each set and whether each irrigation event has to be applied in 2 or more doses (e.g., due to small headspace) one person can typically irrigate between 3 and 6 sets of test plants within the 15 minute irrigation interval. The irrigation time for each set of plants can also be affected by plant density (it is slower and more difficult to direct water past foliage into containers if plant canopies are dense or intertwined), total volume applied per container, and other logistics (such as having to move hoses, etc.).
If irrigating multiple different batches of plants with the same hose and wand, it will be easiest if all containers are the same size and receive the same volume of water. Sets of different-sized containers typically require different flow rates and metronome timings (see Table 2). Also, if irrigation generates splash or involves brushing the wand end against wet plants, decontaminate the wand end between different sets of test plants. This can be done by spraying it with 70% alcohol and then rinsing off the alcohol with water before irrigating the next set of plants.
Post-test equipment sanitation. Rinse all equipment thoroughly and sanitize with diluted bleach (see Phytosanitary Procedures for BMPs for Producing Clean Nursery Stock) followed by a thorough rinse with clean water to remove residual bleach before reusing equipment for tests on another set of plants.
Incubate and evaluate pears as discussed in 3.2. Detection by baiting – general procedures.
Results: Confirmed positive results (Phytophthora lesions confirmed by culturing, sporulation on water-floated lesions, or PCR) indicate that at least one of the tested plants in the block is infected. In a closely-packed block of plants, it is likely that multiple plants are infected. Adjacent blocks of plants should be considered to be at risk of infection, but may not provide positive results if the plants have been infected only recently.
Negative results from a single test should be interpreted with caution. At least one more test conducted at least one week after the first negative test should be conducted to provide a higher level of confidence, especially for plants to be used in sensitive habitats. If initial negative tests were conducted under very cool or warm conditions, additional tests should occur under more moderate temperatures. Greater confidence can be associated with negative tests from nurseries that are stringently following the procedures outlined in Best Management Practices (BMPs) for Producing Clean Nursery Stock.
Figures 3-8:
Figure 3. Timeline showing sequence of activities for conducing bench test of leachate for Phytophthora species using green pear baits.
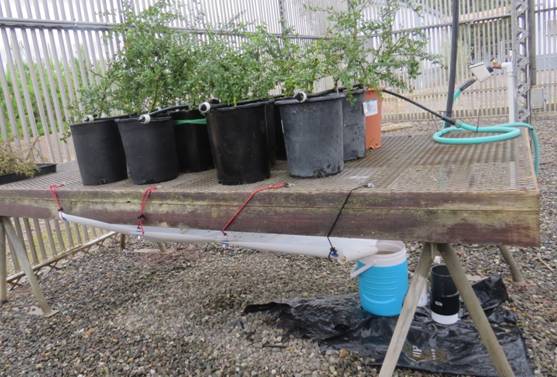
Figure 4. Bench test setup variations. A: Three overlapping sheets of vinyl flashing are held in place beneath the bench using nylon cord with S hooks. Cord tension is adjusted with cord locks to obtain a sloping surface across all sheets that will drain into the collection vessel.
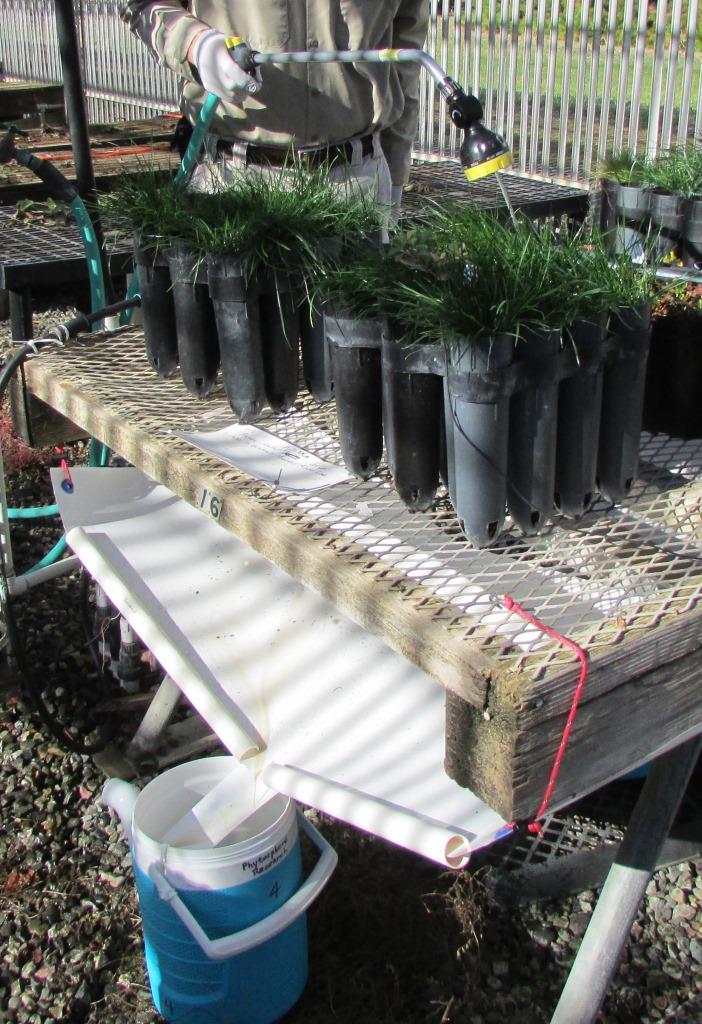
Figure 4B. When plants are irrigated, water draining from the pots is directed into collection vessel, which contains an unwounded green pear as bait. Slit PVC pipe sections at edge of flashing near the collection vessel provide rigidity and help direct flow.
Figure 4C. Collection systems set up with 2 vinyl flashing sheets in parallel on a bench. Sheets are sloped to drain toward the aisle.
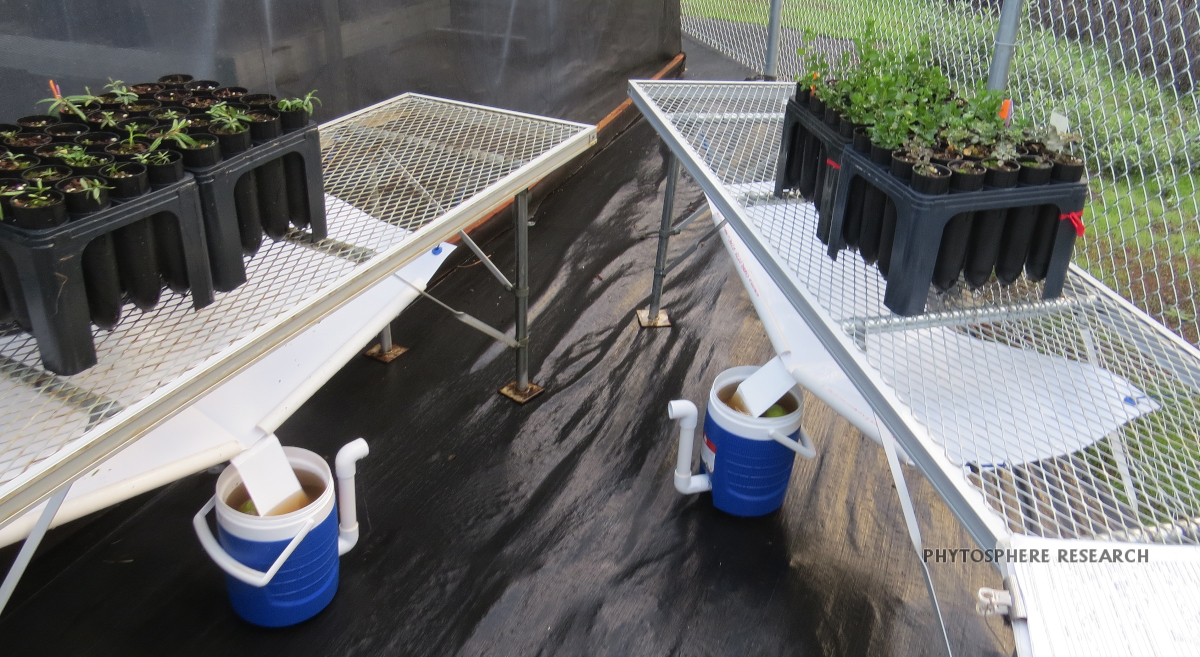
Figure 4D. Collection systems set up under test arrays of 40 DP40 containers. A single collection sheet is used under each narrow bench. Note flow deflectors (vinyl strips connecting sheets with vessels) and pear baits floating behind them.
Figure 4E. Two collection systems set up with 1 vinyl flashing sheet each on a wide cart. Arrays drain in opposite directions to minimize potential for cross-contamination.
Figure 5A. Zoospore collection vessel (ZCV) for bench leachate test. Image shows the height differential between the internal drain pipe and the external overflow. This maintains the water column below the rim as water enters the vessel, and causes water to drain from the lower part of the water column. A guard over the internal drain (plastic cable tie) prevents the pear from plugging the drain. A pool thermometer (shown) can be used to monitor water temperature during the test.
Figure 5B. Zoospore collection vessels (ZCVs) in use. Note overflow from drain pipe in the foreground ZCV. Flow deflectors (vinyl slides) are mounted below the collection sheets to minimz turbulence from water cascading into the ZCVs. Tabs cut into the vinyl deflectors slip into the bottom of the PVC pipe dams mounted on the downslope edges of the collection sheets.
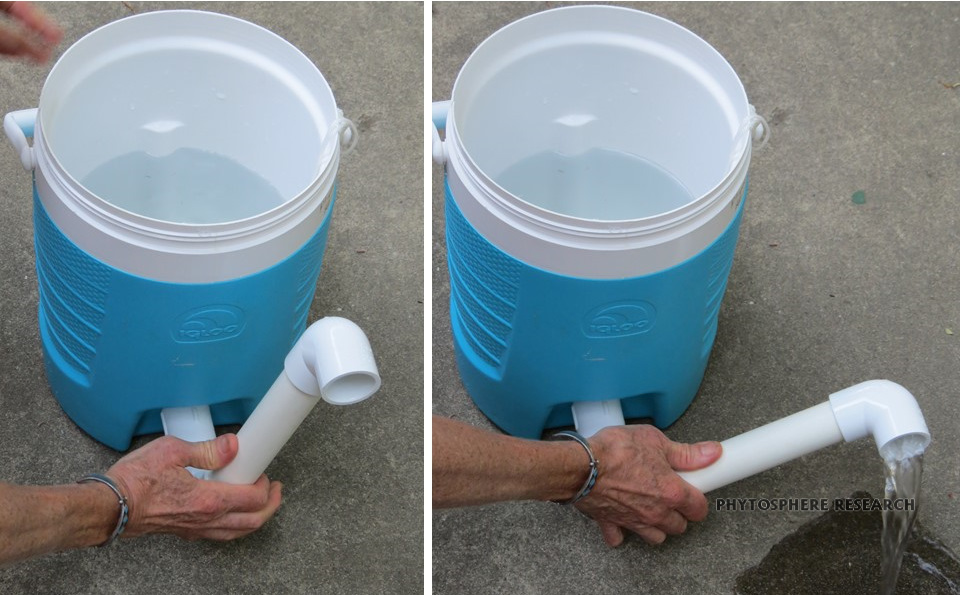
Figure 6. Tilting the outflow of the zoospore collection vessel will allow water to drain from the center of the water column. The objective is to conserve the water from the top of the water column as well as the water and debris at the bottom; this conserved water will be transferred into the bag with the pear bait. Mark the inside of the vessel at the 2.7 L level (small black line below water level, 10 cm above bottom of ZCV) to simplify draining the container to the level that will fit in a heavy-duty 1-gallon zip closure plastic bag.
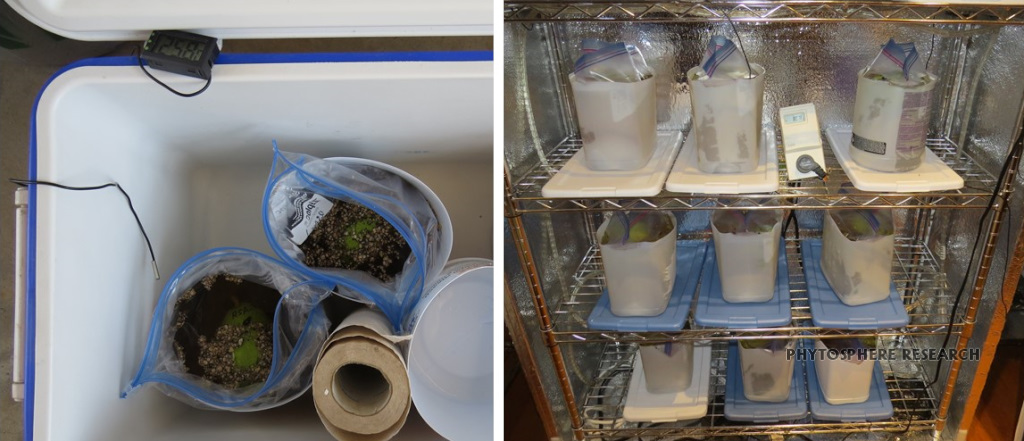
Figure 7. After the 1.5 hour leaching period, transfer the pear bait and about 2.7 L of water from the ZCV into a 1-gallon zip closure plastic bag. A heavy-duty (freezer) bag is preferable; double bag (left) if using regular bags. Each water-filled bag is placed in a rigid-sided container (cut-off bleach bottle or similar) that is as tall as the water level in the bag. After filling bags, leave them in a shaded location with bags open (left) until ready for transport. Seal bags whenever they are moved to prevent spillage. After transport, plastic bags are left open for the 3-day incubation period during which the pears float in the leachate (right - see also instructions for building a simple incubator).
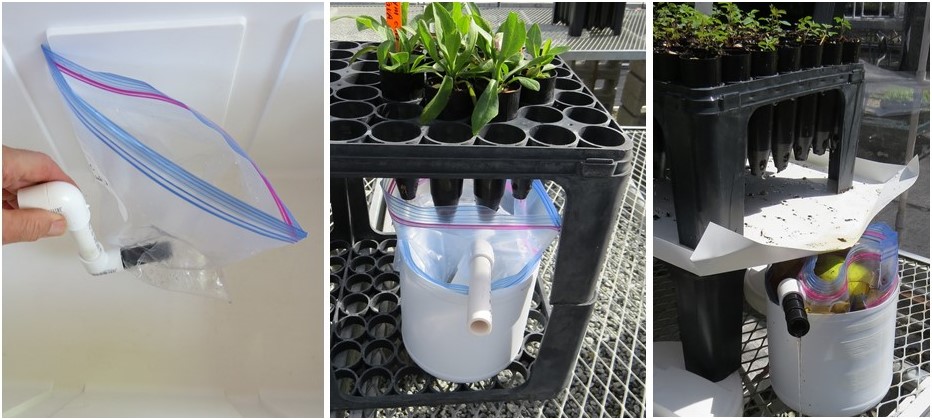
Figure 8. A mini ZCV can be used for test arrays consisting of few and/or very small containers (center, right). Such an array does not generate very much leachate during the test so a smaller ZCV can be used. The mini ZCV uses the same design principles used in the standard ZCV but a heavy-duty (freezer) 1-gallon zip closure plastic bag is used in place of the plastic jug (left). We recommend overbagging the mini ZCV as in the center and right hand photos to protect against slow leaks where the spout threads through the bag.
8/25/2022 - Changed link at top from single video to videos page which has links to several videos. Edited "recommended practices" to clarify sampling recommendations with respect to numbers of tests for batches/sub-batches/blocks.
12/11/2019 - Added link for directions for constructing an irrigation wand.
Updated 9/23/2019 – Rearranged, modified Recommended Practices for consistency with 2.4. Optimizing sample method and sample size for the bench leachate test, added cross-reference. Some additional edits for clarity.
Updated 3/26/2019 - edited for clarity and consistency.
Updated 2/26/2019 - added new example row to Table 2.
Updated 2/5/2019 - uploaded a new version of the sample datasheet, clarified that dead plants should not be included in bench test - they should be tested separately.
Updated 12/26/2018 - additional editing and text plus some reorganization of protocol; updated flow chart; added info and table relative to use of metronome for timing; removed short description of long-duration protocol; substituted two images with newer images and updated legends.
Updated 12/19/2018 - updated container type by target irrigation amount table.
Updated 10/9/2018 - more details on standardizing irrigation volumes by container volume, with associated edits and some reorganization. Added description and image of mini ZCV.
Updated 8/22/2018 - additional details added to standard protocol irrigation procedures, including guidance on irrigation volumes.
Updated 8/19/2017 - expanded explanations, added more photos, a figure illustrating timeline of bench baiting process, and a link to sample datasheet for bench testing.