Version 9/23/2019
Application: Testing symptomatic or suspect individual plants. Tests entire root system of individual plants for the presence of Phytophthora by detecting zoospores released after a flooding period.
Advantages: Fairly sensitive test of entire root system, relatively easy to conduct. Does not expose other plants to inoculum from tested plant. Leachate and flooding protocols are nondestructive and do not require that plants be unpotted. The soil/root sample baiting protocol can be used on dead plants, which may not yield positive results in other protocols. No false positives if bait spots are confirmed by culturing. Culturing can identify Phytophthora species present.
Limitations: Positive reactions require at least several days to develop and can take longer to confirm depending on methods used. Baiting conditions (temperatures, irrigation history) can affect test sensitivity. Previous application of fungicides (systemic oomycete suppressive chemicals) to tested plants may interfere with test. No single bait is optimal for all Phytophthora species. Not suited to testing large numbers of plants. Leachate and flooding protocols are designed for plants that have been regularly irrigated up to the time of testing and are likely to have sporangia present and should not be used for plants that have been dead or dry for an extended period.
Methods: Standard baiting uses green, nonwounded pears, which can be infected by a wide variety of Phytophthora species. Leaf baits can also be used if you have arrangements for testing these baits. To minimize the possibility of cross-contamination between plants, wear waterproof gloves when handling containers and pear baits. Sanitize gloves before handling a different plant or other items associated with them. See 3.2. Detection by baiting – general procedures and details for water samples and Using green pears to bait for Phytophthora for more detailed information on the use of pear baits.
There are 3 methods that can be used for individual plant baiting:
The first method (soil/root sample baiting) is normally a destructive testing method, whereas the two remaining methods are nondestructive. If the plant of interest is dead or shows severe disease symptoms (and is not a viable or saleable plant), the soil/root sample provides the greatest sensitivity.
For all protocols, you will normally need to remove the plant(s) to be tested from the block of plants on the bench. When doing so, take care to avoid potential contamination of other plants from water, potting media, or plant debris from the sampled plant. If possible, place a clean tray under the plant or place it immediately into a clean bag for transport. Collect necessary data on the plant’s location and symptoms for reference; photos are a good way to document these. Conduct tests on a clean sanitized surface away from other plants.
1. Soil/root sample baiting of the plant root system: This protocol is an adaptation of the technique used in field sampling to detect Phytophthora. It is the preferred method for testing plants that are completely or nearly dead from Phytophthora root rot, because such plants do not always have sufficient sporangia present to yield a detection using the leaching or flooding protocols. This method can also be used to destructively test all or part of the root system of a live plant.
Use clean gloves for handling each plant and during all sample handling steps. Remove the plant(s) from the production area and transport to a clean work area. Cut off and discard the plant top. Look for evidence of a canker at the base of the stem, which may develop in plants with Phytophthora root rots. Such tissue can be tested directly by a lab and could also be tested using a test strip (see Section 3.1); otherwise discard the top. If the plant root ball is small enough, place the entire root ball into a heavy-duty (freezer) zip closure bag, breaking it up by pulling it apart. Note the condition of the root system and photograph for reference. The root system and soil should not take up more than about 1/3 of the space in the bag. If the root system is too large for a single bag, you may split it across two or more bags. Alternatively, especially for large containers, you may only be able to sample part of the root system. If sampling only part of the root system, attempt to include as many symptomatic roots as possible in the sample; the sample should generally include more roots (live and dead) than potting media. Preferentially sample roots that are partially dead or recently killed. Roots near the bottom of the container are also a priority for inclusion, especially if they are symptomatic. You may want to take 2 or more samples from large container plants (#5 or larger).
Note: To prevent any adverse impacts of chlorine on zoospore activity, for the baiting process, we prefer to use charcoal-filtered tap water or an equivalent nonchlorinated (or declhorinated) drinking water, such as boiled and cooled tap water, or tap water that has been held in an container open to air for a day or more. Chlorine levels in municipal tap water can vary over time, and this may not be a significant issue depending on your water supply.
If the potting media has been dry for a period of time before sampling: Use nonchlorinated water to moisten but not saturate the soil. You may need close the bag and mix the sample after adding small amounts of water to ensure the entire sample gets moistened. Unseal the bag and fold the top over loosely to allow some air exchange and pre-incubate the moistened sample at moderate temperatures 18-24°C (65-75°F) for 3 days. Check the sample daily and mist the surface with water if it starts to dry out. Pre-incubation can improve detection in samples that are dry. After 3 days, continue to bait the sample as noted in the next paragraph.
If the potting media has been moist (regular irrigation): Place the sample bag into a rigid-sided container that will support the bag once water is added (see Section 3.2). Prepare and label a green pear (Section 3.2). Using your hand on the outside of the bag, create a small depression in the center of the soil/root mass and place the bottom of the pear into the depression. Forcing the pear into the roots and soil can puncture or scratch the pear epidermis. Add nonchlorinated water to the bag until the surface of the soil /root mass is covered by about 2.5 cm (1 inch) of water. You may need to use a clean glove or a sterilized pair of scissors or pruning shears to bend or clip roots so that they lay down flat enough to be covered by water. Incubate and evaluate pears as discussed in 3.2. Detection by baiting – general procedures and Using green pears to bait for Phytophthora.
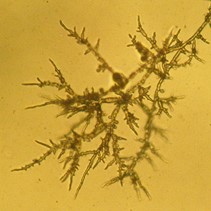
Soil/root sample baiting of the plant root system in a one-gallon zip closure bag. Pear has been rotated from its original stem up position to show Phytophthora lesions that have formed on the pear. The white material is perlite from the soil mix floating on the water surface.
2. Leaching of the plant while in the container: This method can be used to nondestructively test plants in a range of container sizes, but may not be as sensitive as a destructive test of the entire root ball. It is basically a single container version of the bench testing leachate test protocol. Follow the directions given at bench testing leachate test protocol to conduct the test. Place the container to be tested over a runoff collection system or directly over a zoospore collector vessel (ZCV). The collection system can be a sheet of vinyl suspended below the bench under the plant, a smaller tray or vinyl sheet sloped to empty into a ZCV, or a plastic bag with a hole cut in one corner that funnels leachate into the ZCV (Figure 2a). Use Table 1 at bench testing leachate test protocol page to estimate the amount of water that will be generated by the test, which will approximately equal the container volume shown in column 2.
Depending on the volume of water that will be generated by the test, leachate can be collected into a standard ZCV, a mini ZCV, or a plastic bag. If the total leachate volume will be less than 2.7 L you can use a 1 gal plastic bag (or smaller if it will hold the entire leachate volume) supported in a container. If total leachate volume will be between 2.7 L and 6 to 8 L you can use a mini ZCV or a standard ZCV. For tests that will generate a total volume over 6 to 8 L use a standard ZCV. Minimize the distance between the container and the collection vessel to minimize splash and reduce turbulence. Using a vinyl flow deflector (slide) to direct water flow into the ZCV will also help.
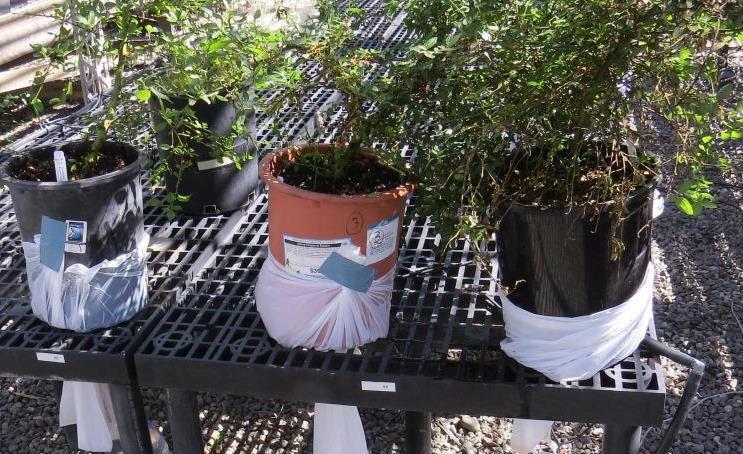
Figure 2a. Leachate method being used on individual 5 gallon container plants. In this photo, the white plastic bags function as runoff collection systems. A hole in one corner of the bag is placed so that runoff drips through the hole into the ZCV. Each of these tests will generate about 14.4L of leachate per pot, so leachate should be collected into a standard ZCV.
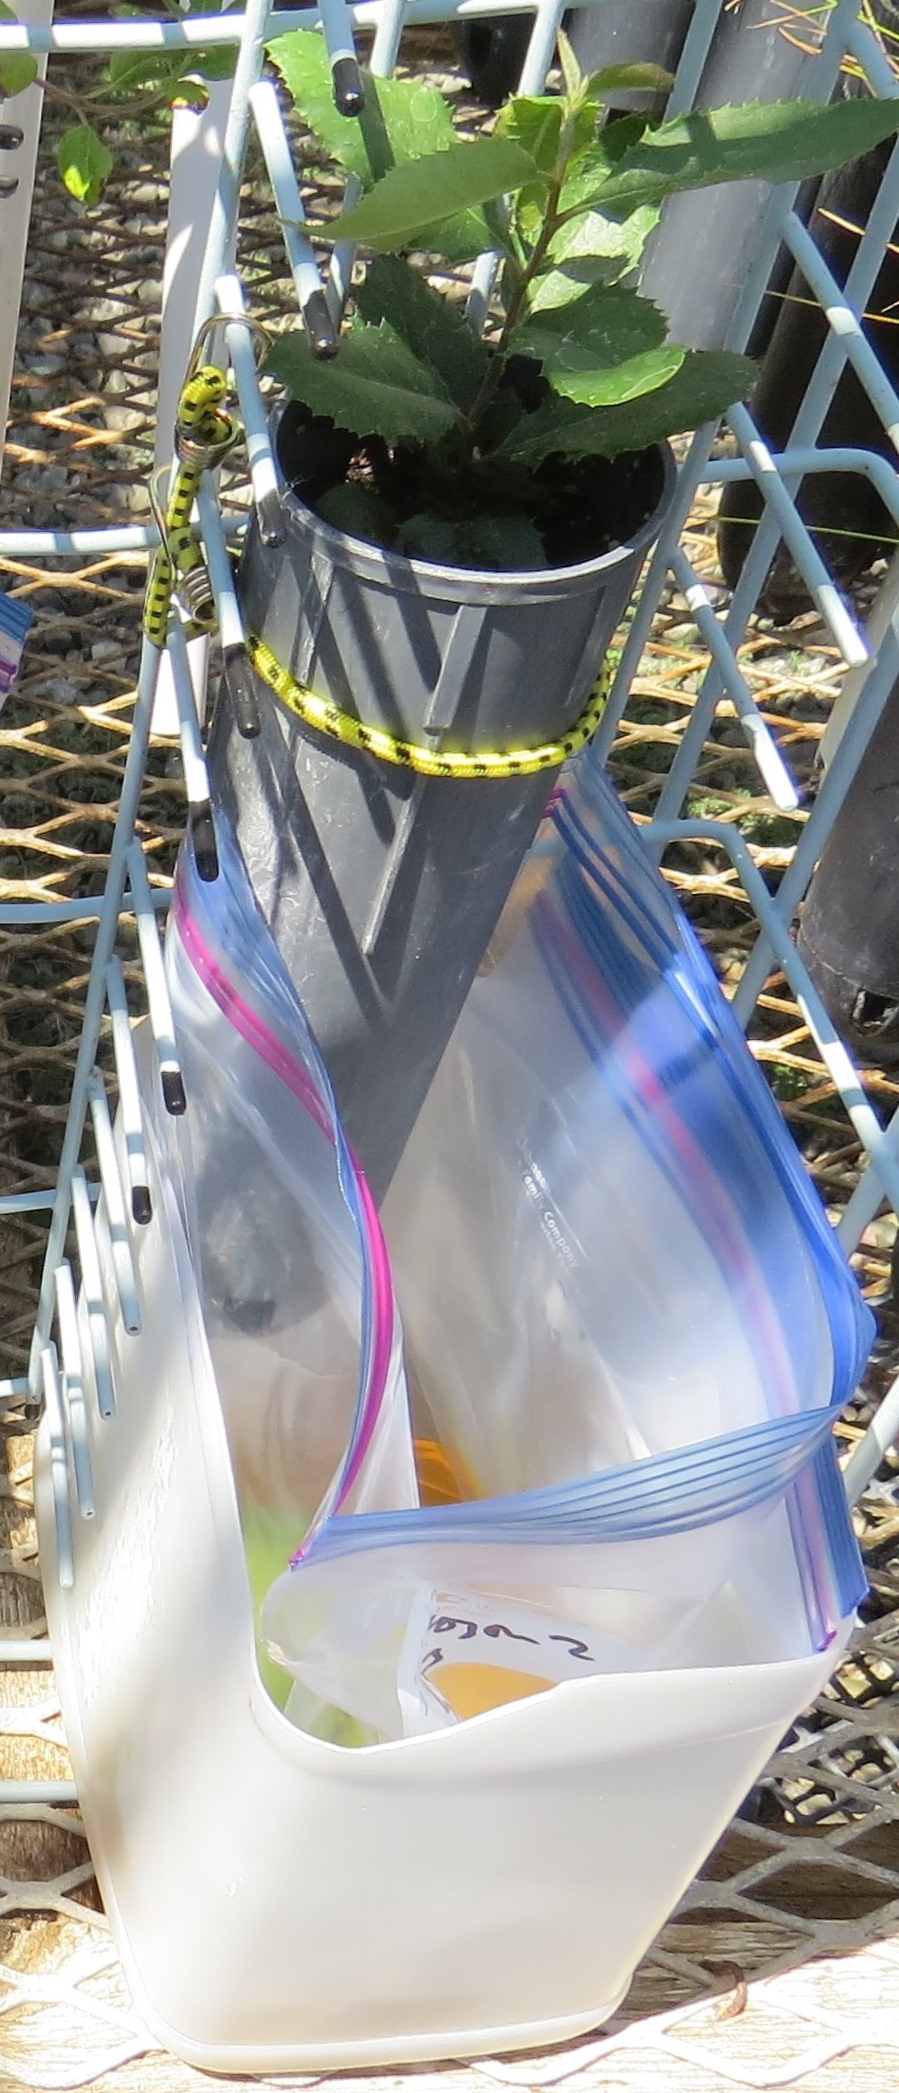
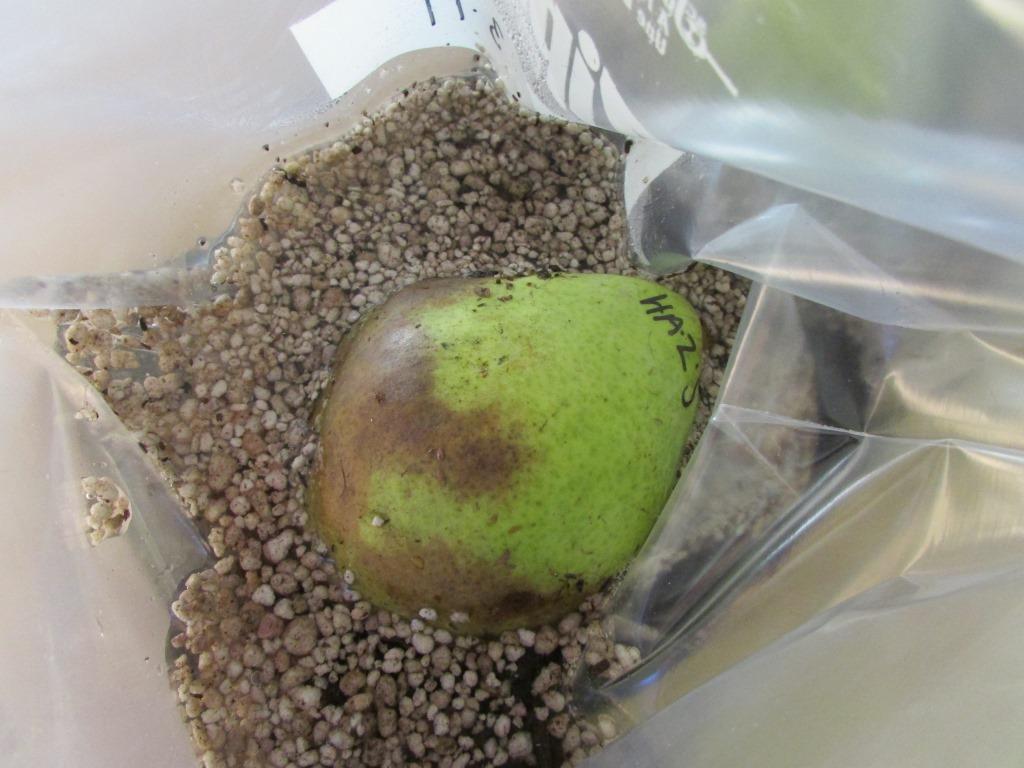
Figure 2b. Leachate method being used on individual plant in a Deepot DP40 container. A bungee cord holds the container in place on metal frame. Leachate is collected directly into a 1 gallon zip-closure bag containing a green pear bait. The total applied irrigation for a single D40 container is 660 ml; the zip-close bag in its supporting container can hold up to about 2.7 L.
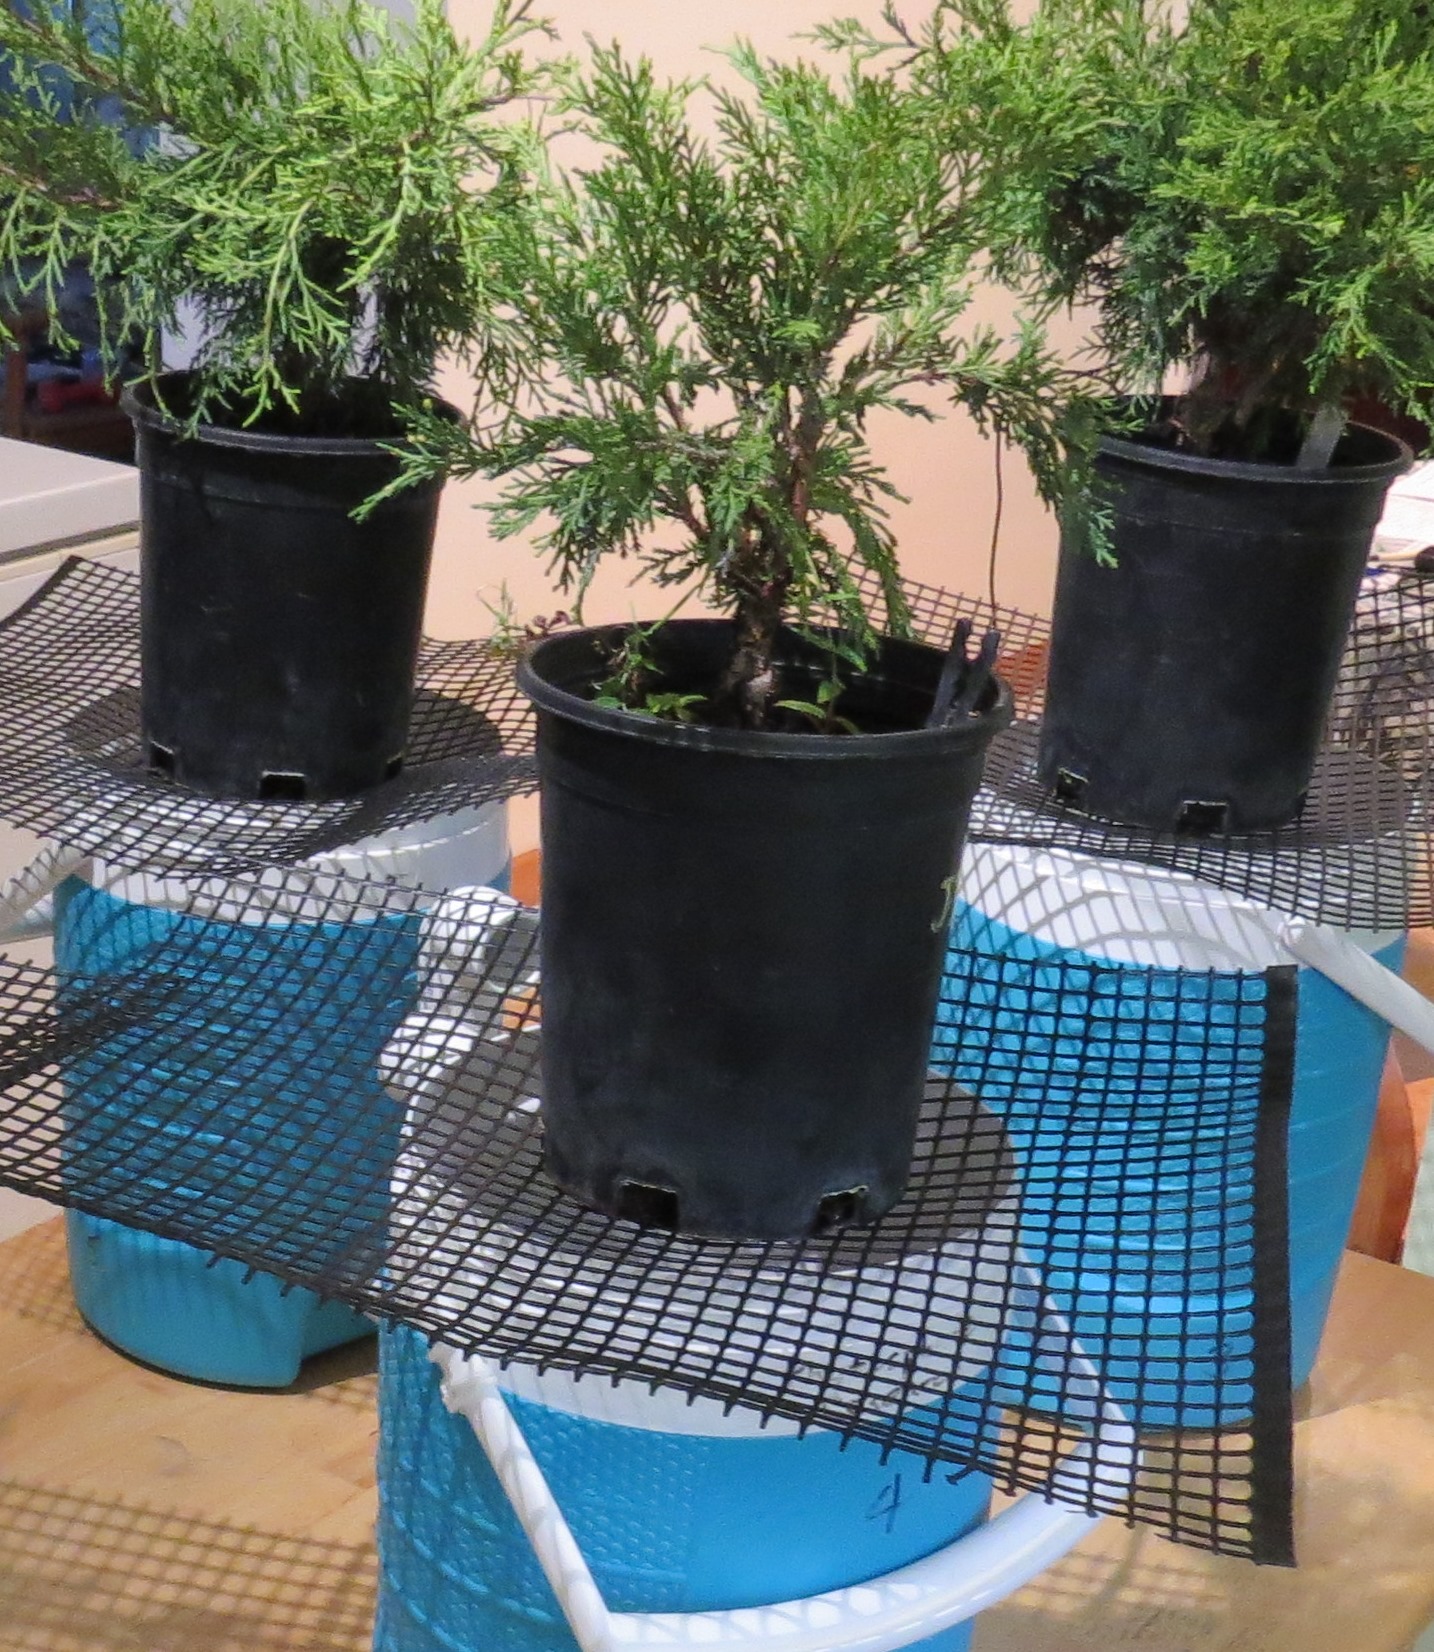
Figure 2c. Leachate method being used on individual #1 (“1 gallon”) plants. Plastic mesh holds pots above 2.5-gallon zoospore collector vessels (ZCVs) containing green pear baits. Because the ZCV opening is wide enough, a separate collection system is not needed. The test requires 3 L of irrigation for each #1 container. About 2.7 L of leachate and the pear from each ZCV will be transferred to plastic bags for incubation.
3. Flooding of the plant in the container: The main advantage of this method is that it is fairly simple to conduct, but it may not be the most sensitive of the methods listed here. This method is most suited for 1 gallon or smaller stock in relatively short containers. Use the leaching method above for larger or especially tall containers.
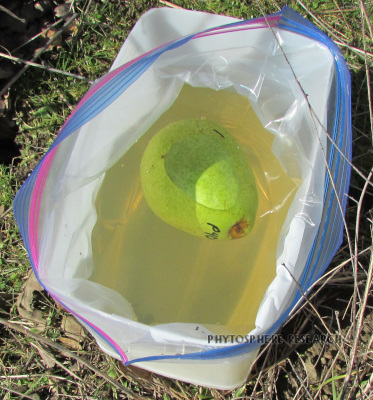
Place the container of each plant to be tested in a heavy-duty plastic bag (a #1 container will fit in a 1 gallon Ziploc® freezer bag). If the container has enough room on top, use a clean waterproof glove to make a slight depression in the potting media in the top of the pot and place a rinsed, labeled, unwounded green pear in the depression (Figure 2d). Set the pear lightly in the depression to avoid scratching it, especially if the potting media contains abrasive components such as perlite or lava rock. If using a smaller pot, place the pear in the bag alongside the pot (Figure 2e) and place these in container that helps to support the water-filled bag. Leaf baits, if used, are added to the water on top of the container or in the bag at this time. Irrigate the plant with clean water until water level is above the surface of the soil in the container (Figure 2d,e). Minimize the volume of water needed to accomplish this by using a supporting container that is as narrow as possible. Water temperature should be in the range of 18-24°C (65-75°F). Do not expose the flooded plants to direct sun that could allow the water to heat up excessively.
Leave plants flooded in the bags for one to two hours. At the end of this period, remove the pot from the bag and allow the excess water to drain from the pot into the bag. . Collect drain water from the plant container until dripping has stopped or nearly stopped. If it is not already in one, the water-filled bag will need to be supported in a plastic container, such as a cut off 1-gallon plastic bottle (Figure 2f). The total water volume from each pot will vary by pot size, but typically should be between 1 and 2.5 L. If the pear bait was in the top of the container, transfer it to the water in the bag using a clean waterproof glove immediately after the pot is removed. Wash, sanitize, and rinse your gloves before handling another test plant.
Incubate and evaluate pears as discussed in section 3.2. Detection by baiting – general procedures.
Results: Confirmed positive results provide proof that the tested plant is infected. Adjacent plants should be considered to be at risk of infection, though Phytophthora may not be detected in follow-up testing if the plants have been infected only recently. As discussed in section 1, negative (no detection) results from a single test should be interpreted with caution.
Greater confidence can be associated with negative tests from nurseries that are stringently following the procedures outlined in Best Management Practices (BMPs) for Producing Clean Nursery Stock. If plants are targeted for use in sensitive or other non-infested sites, a second test conducted at least 1 week after the first, and testing with additional bait types, should be conducted to provide a higher level of confidence.
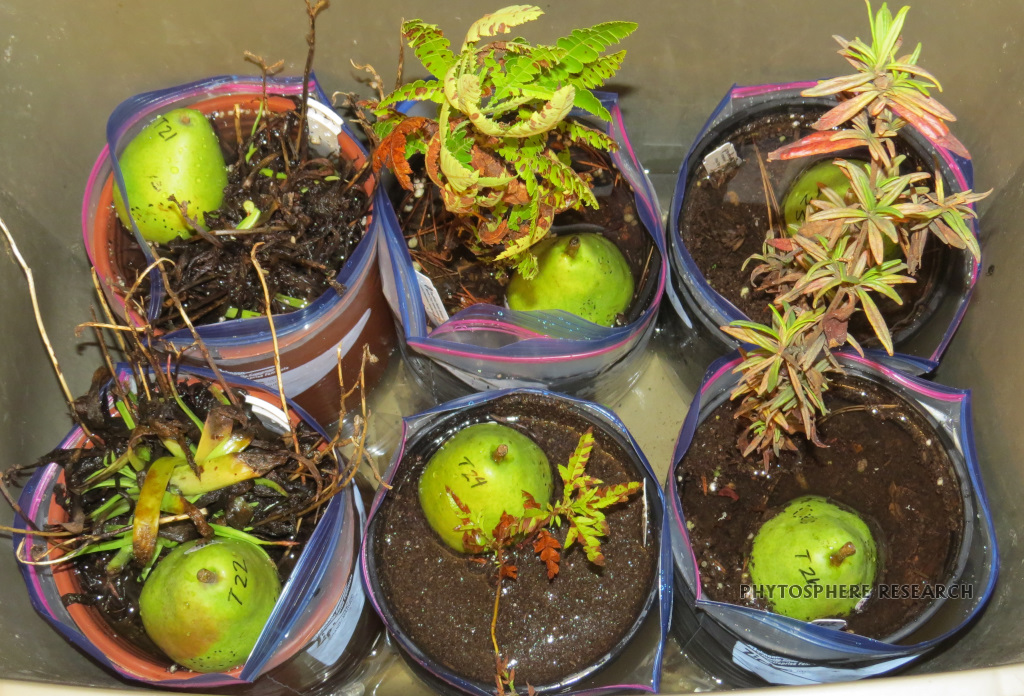
Figure 2d. Baiting of individual flooded plants. Water is added to pot until water level is at or slightly above the top of soil in the pot. Pears were placed in each container before flooding.
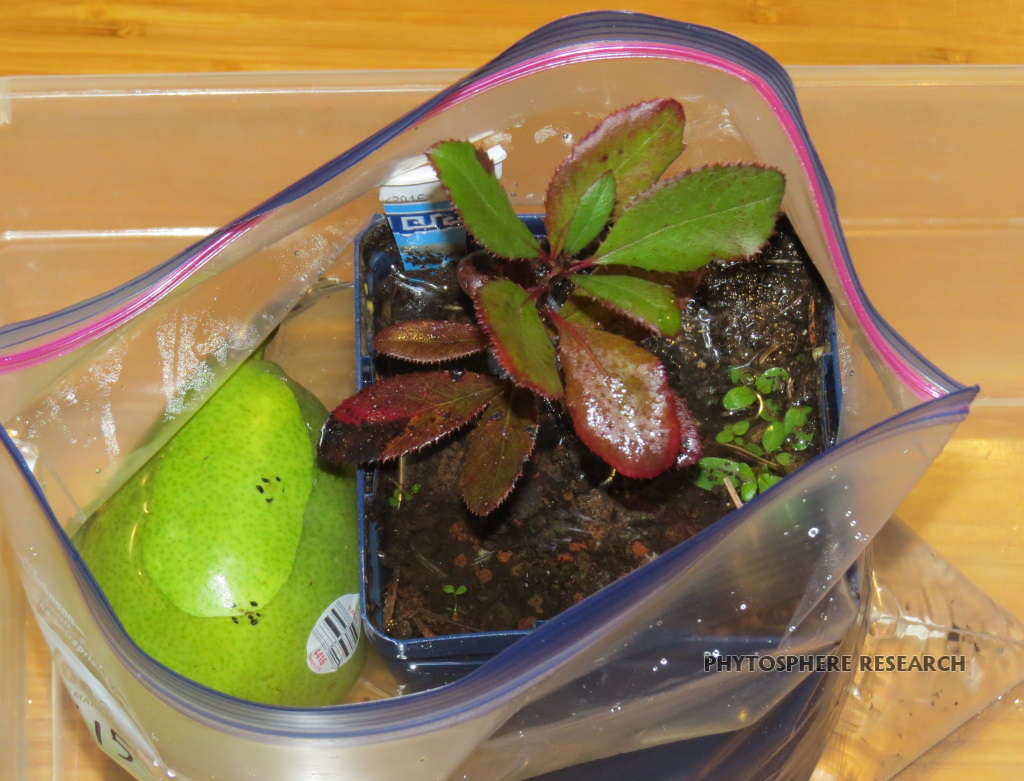
Figure 2e. Baiting of individual plant by flooding. For small containers, the pear bait is added to the bag rather than placed into the top of the container.
|
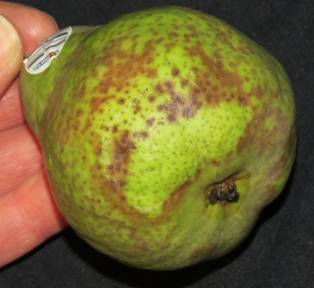 |
Figure 2f.The bait is incubated in the water (left) until symptoms develop or for up to 3 days. Pear bait on right was removed 2 days after being placed in water from an individual pot test of a Ceanothus and shows extensive early symptom development. Note that most of the of the infections are associated with lenticels in this pear.
Updated 8/24/2017 - added images, updated to show adding pears to pots/bags during flooding period.
Updated 1/27/2019 - added methods for whole plant baiting and individual container leaching and associated images.
Updated 2/28/2019 - added additional images.
Updated 9/23/2019 - edited for clarity, added additional explanations.