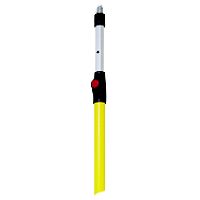
High reach spray wand
-Material is applied where the bark is thinner and more permeable.
- Moss cover is often less dense higher up the stem, so less of the phosphite may get absorbed and tied up by mosses.
- As the residue is rewetted by rain and is washed down the stem, it has additional opportunities to be absorbed in the lower portion of the stem, rather than being washed into the soil where it would be largely unavailable for uptake by the tree.
In several ongoing studies, we have used a custom spray wand to apply phosphite in a band high on the trunk. Application of spray to a height of about 6 m (19.7 ft) can be accomplished by assembling a custom spray wand from appropriate nozzles and some items available at a hardware store.
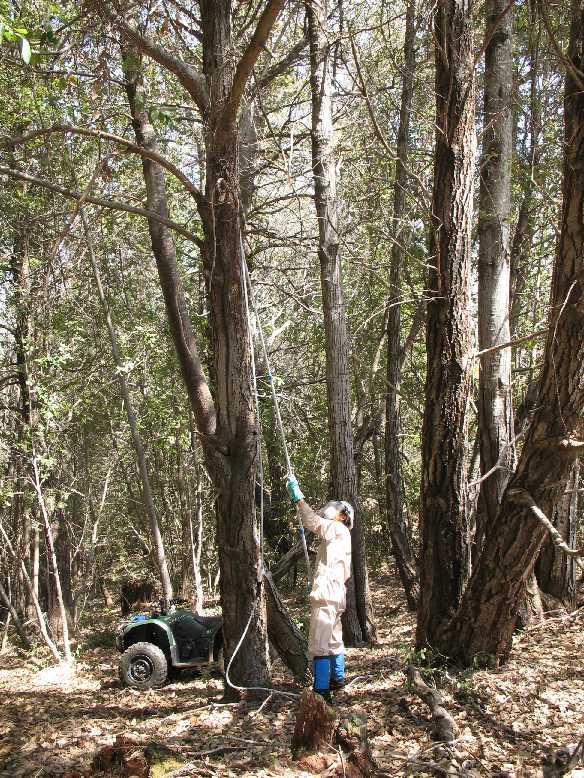
Tanoak stem being sprayed using a high reach spray wand attached to an ATV-mounted tank sprayer.
Spray wand components
Extendable pole
Any lightweight extendable pole of sufficient length will do. We have used aluminum poles that have an extended length of about 4 to 5 m (12 to 16 ft). The primary considerations in selecting a pole are noted below.
Weight - How much weight do you want to be balancing up in the air above your head? Remember that the liquid filled hose will add a substantial amount of weight to the wand while it is in use. If you are only spraying a few trees at a time the weight issue may not be all that significant, but will be more of an issue if you are spraying for hours on end. We have used aluminum poles, which tend to be the lightest, but can be a bit flimsy if too thin. Fiberglass or fiberglass/aluminum poles can be stronger but are generally heavier.
Retracted length. Telescoping poles tend to be available in either two- or three-section versions. Two-section versions tend to be more rigid, but can limit how low you can spray on the trunk (needed for smaller diameter trees) and can be more problematic to transport. We have used both, but I generally prefer having three sections.
Construction. We have used extendable poles made for painting or for pool vacuums. Those made for painting have a threaded end that allows you to use a a paint roller frame for mounting the nozzles as described below.
If you want to be able to vary the pole extension while spraying, which can be handy especially for smaller trees, it's helpful if the sections have a locking mechanism that is easy to use and fairly robust. We've used several types and haven't been entirely happy with either of the types that use a twisting motion to lock the sections (either using an internal cam or an external pressure joint). These tend to be difficult to manipulate when wetted with spray solution, especially the very slippery Agri-Fos / Pentrabark mix. Locking levers (as used on many tripod legs) or button lock mechanisms (image at left) are probably superior, but are generally found on heavier and/or more expensive poles.
In a pinch, we have devised a somewhat inelegant-looking but relatively effective solution using a hinged rubber cleat mounted on the pole (diagram below). This allows the pole to slide upward and lock in place at any elevation. The cleat is opened slightly by hand to allow the pole to retract. This is best done when the bottom of the pole is resting on the ground. This is definitely a prototype setup that needs further refinement.
Because phosphite is corrosive to materials such as steel and brass, avoid poles that use these materials in critical areas, such as the locking mechanism, and thoroughly clean equipment immediately after use.
Spray wand head and nozzles
As noted above, phosphite is corrosive to brass, so use only plastic or stainless steel nozzles and nozzle bodies.
Low drift nozzles are preferable for this type of application. We have used TeeJet Air Induction nozzles (AIXR11003 or AIUB03VS) operated at a wand pressure of 25-30 psi. The AIUB03VS nozzles are offset nozzles, so we align the nozzles so that the wide portion of the pattern of the two nozzles are in opposite directions. To minimize overspray when treating tree trunks, which are relatively narrow, the long axis of the spray pattern is oriented vertically.
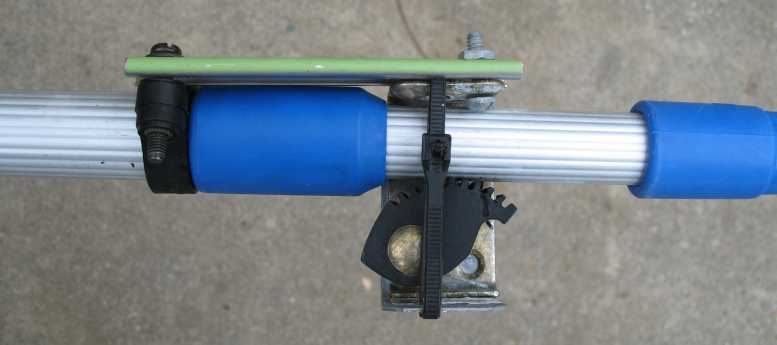
If you are using a pole made for painting, you can bend a mini paint roller frame into a bracket that will support the spray nozzles and can simply be screwed onto the top of the pole (photo above). Clamp the roller frame into a vise and bend it as needed the shape you want (the actual bends needed will depend in the original frame configuration). Be sure to get a good quality roller handle. The head is subjected to a certain amount of torque and the plastic handle is a potentially weak point that can crack if it is thin or made of a brittle plastic.
We have attached the nozzle head to the roller frame with cable ties. The configuration shown has two nozzle bodies and a ball valve that allows one to be closed off for low volume applications needed for small stems.
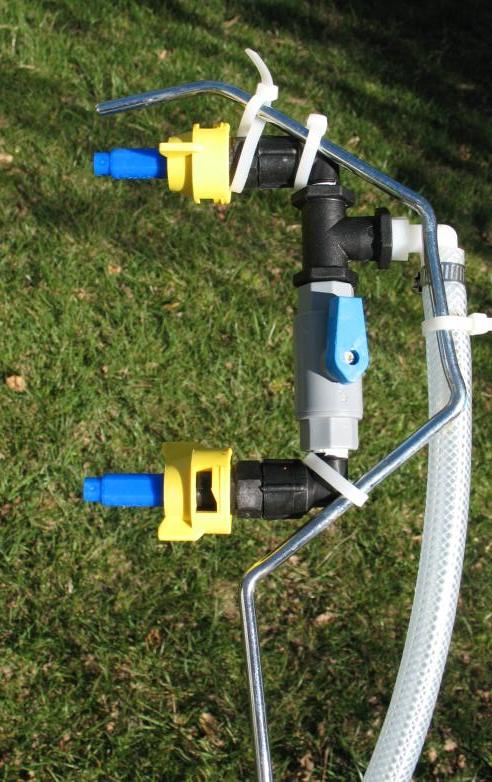
The rather confusing image to the right is an alternative spray head which we have used in connection with a swimming pool vacuum pole. We used a two nozzle body with a swivel. One nozzle is closed off using a cap (black) in the photo, since there is no easy way to incorporate a valve in this sort of head. Two types of pipe clamps are held together with the bolt to attach the nozzle bodies to the pole. The brass hose barb at the left side is attached to the original mounting structure we used. However, this first version had some brass parts that corroded to the point that we couldn't get the old part off the wand without cutting it off. Again, as shown in the image, the wide axis of spray pattern is oriented vertically to minimize overspray.
Wand trigger
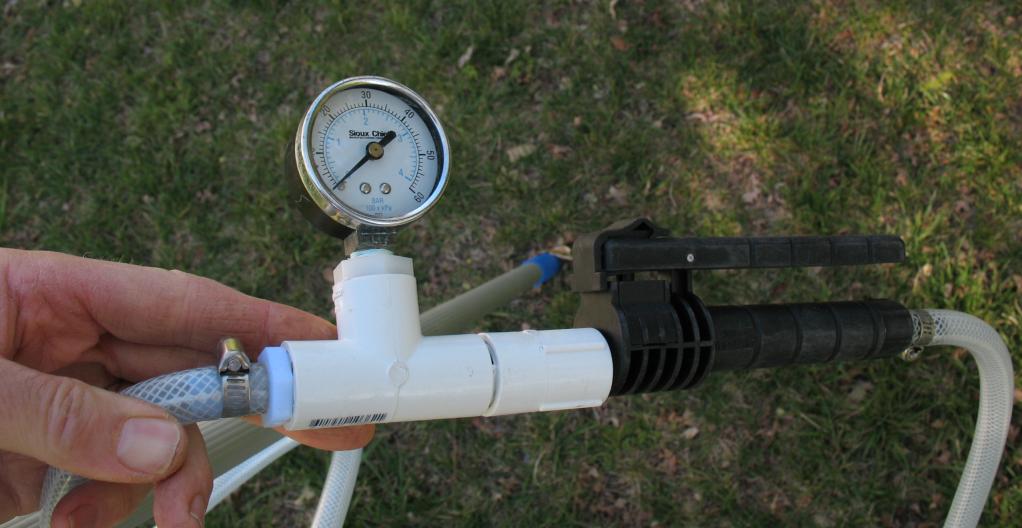
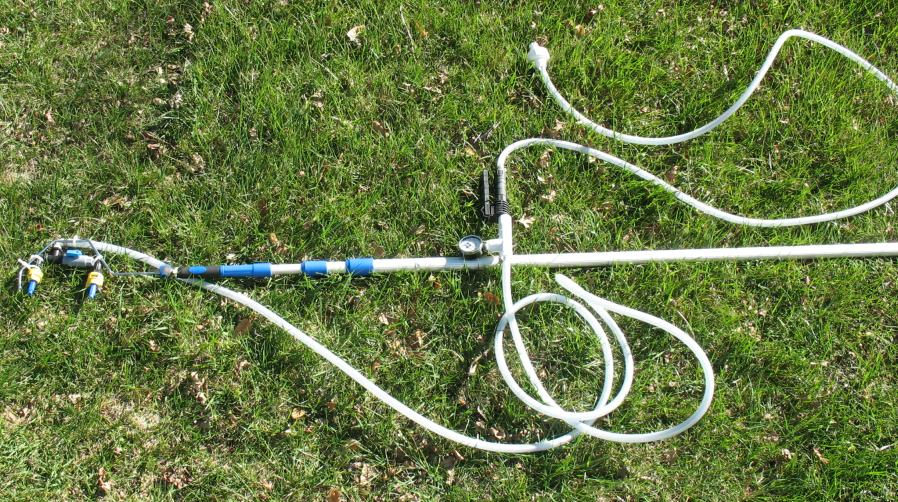
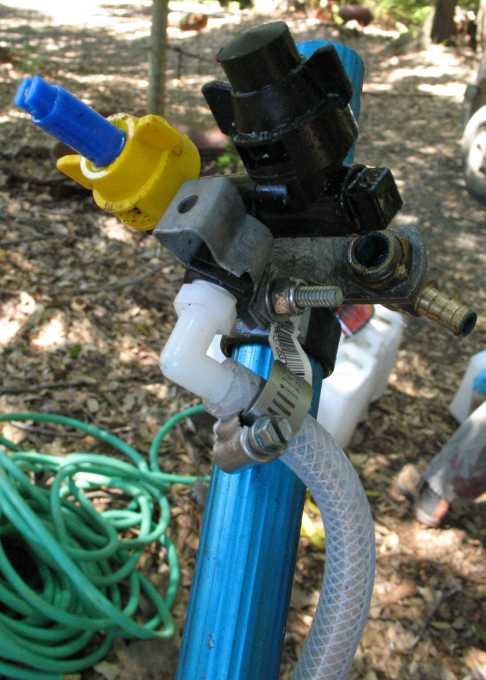
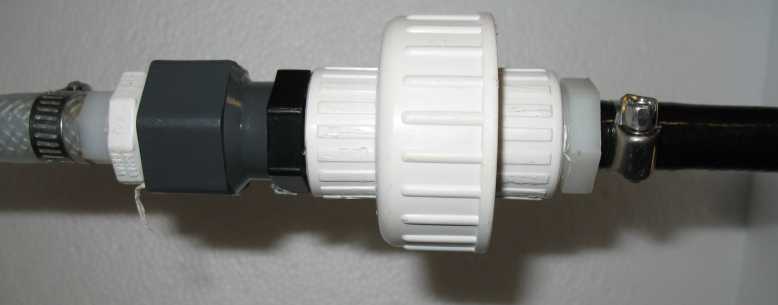
Because we have been doing calibrated applications, it is necessary to monitor pressure at the wand to ensure that the proper flow rate is being maintained. We plumbed in a pressure gauge downstream from the spray wand trigger to monitor pressure here. We have used relatively short (up to 50 ft) hose runs between the a low pressure sprayer and the wand trigger, so it has generally been easier to control the pressure at the wand by adjusting the regulator back at the sprayer.
If using a high pressure sprayer with a long hose, it would be necessary to add a pressure regulator upstream from the gauge to adjust the flow rate. Again, because of the corrosiveness of phosphite, brass regulators cannot be used. We have used a Watts Plastic Miniature Water Pressure Regulator (P50-60) at the sprayer and one could be installed at the wand for this purpose.
In our wand, we have used 1/2 inch PVC schedule 80 threaded unions as a quick connect that allows us to separate the hose wand from the bulk of the sprayer hose. A plastic swivel joint is included near the union to prevent twisting of the hose or accidental unscrewing of the union.
When using an ATV-mounted tank sprayer to do timed calibrated applications, it can be easier to control the application time by shutting off the pump rather than by using the wand trigger valve. The wand trigger valve is left in the locked on position, and the person timing the application cuts the flow to the wand by switching off the pump.
Sprayer setup
In order to apply calibrated amounts of spray solution to each stem, we need to use a sprayer that can deliver a constant flow rate.
ATV-mounted sprayer
For applications to large numbers of trees on fairly accessible sites, we have used a recirculating 12 volt battery powered ATV Sprayer. These are available from various manufacturers, but some modifications are in order if used for phosphite stem spray applications (Agri-Fos + Pentrabark surfactant). First, if the regulator is brass, plan to replaces it with a plastic regulator, such as the Watts Plastic Miniature Water Pressure Regulator (P50-60) as shown in the figure below. In this sprayer, the pump runs at a constant speed. Pressure to the spray line is controlled by adjusting the regulator to adjust the flow that recirculates back into the tank. This setup has worked on one ATV sprayer, but in the sprayer pictured, we were unable to get sufficient flow through the regulator to achieve our target line and wand pressure. We switched the position of the Watts regulator to the spray wand side of the tee and moved the pressure gauge downstream from it. We then used another plastic valve to regulate the flow back into the tank. That arrangement allowed us to adjust the pressure to the spray line to the target range and actually provide more accurate flow control.
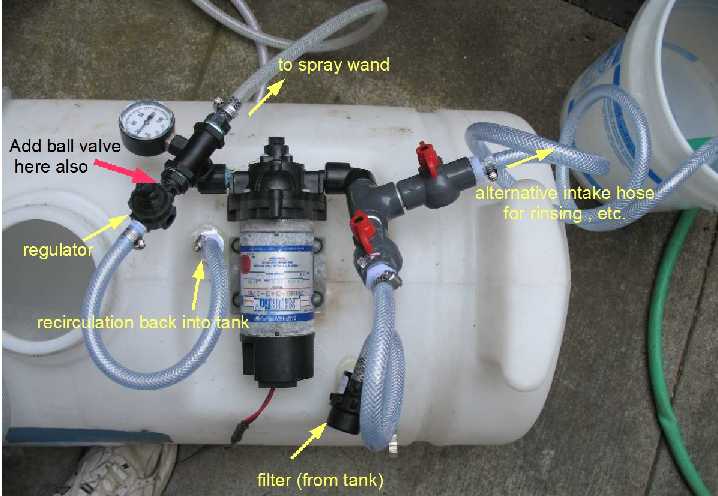
Another necessary modification is adding a piece of hose to the recirculating line inside the tank if it discharges near the top of the tank. A major issue for the Agri-Fos-Pentrbark mix is foaming, so the recirculator needs to discharge near the bottom of the tank.
This photo was taken to show a bypass setup that was plumbed in to allow an alternative intake source from outside the tank to be used. This allows you to rinse out the pump and line without emptying the tank. The alternative intake also allows for the application of a calibrated volume of material directly from a smaller container. The diagram shows where an additional ball valve is needed to prevent the liquid from the alternative uptake from recirculating back into the tank. Using a ball valve where noted is superior to trying to cut off the recirculation by cranking down the regulator.
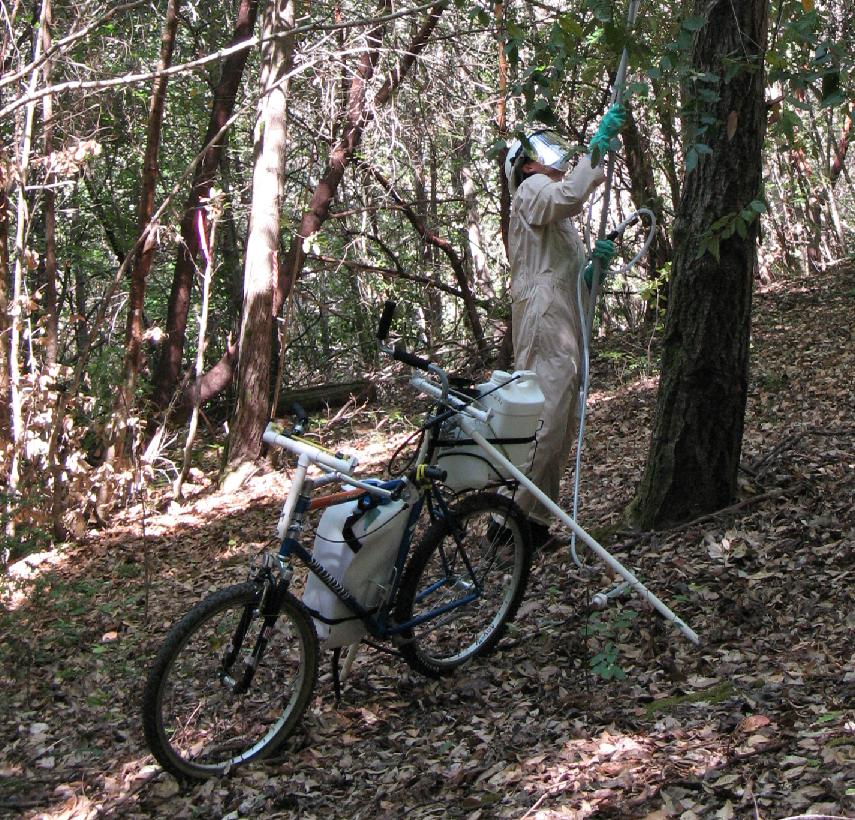
Spray bike
For small volume applications, especially in terrain that is difficult to access with vehicles, we have used a Shurflo Propack 12V battery-powered backpack sprayer. This sprayer has an on-demand electric pump that provides uniform pressures at each of its four preset rate settings. We mount the sprayer on a mountain bike that has been modified for use as a cargo bike. This not only gets a lot of weight off the applicator but allows the freedom of movement needed for the high bole application.